Earlier we had defined the various elements of the Principal component Analysis (PCA) process. In order to link these elements and arrive at a feasible solution we will use the Solver Function. We define target, change and constraint cells through this function and run it to determine the final values of the eigenvectors and values.
The results from the running the solver function will be used in determining the number of factors that will be considered to explain the volatility of the term structure. The selected factors will be scaled so that the model is calibrated to the current actually observed volatility in the term structure.
Define the additional constraint cells
In the next stage of this process we define the following cells on the excel worksheet:
- Eigenvalues
- Percentage
- Cumulative

Eigenvalues in the cells above are equal to the diagonal cells of the matrix PΣP’ calculated above.
Percentage is the proportion of that eigenvalue to the sum of all the eigenvalues expressed as a %. For example the sum of all the eight eigenvalues above is 0.0501. The percentage of eigenvalue λ1 to the total eigenvalues is 0.0364/0.0501 = 72.64%. It represents the proportion of the volatility in the term structure that is explained by the eigenvector p1.
Cumulative is the cumulative percentage. We can see that the first three PCs in our example explain 96.09% of the total volatility.
Set up Solver in EXCEL and run
In this step we will link up all the pieces we have constructed so far. We do so by using Excel’s Solver function. In the solver function we will define the following cells:
Target Cell: In this case this is an arbitrary cell. Our main focus is on the “Cells to be changed” and the “Constraints” cells defined below. We have set the target cell as the Cumulative cell at i=8 (i.e. the last Cumulative cell) and we have set this cell to a value of 1. This is arbitrary because in any case this cell will always equal to 1 (or 100%) because of the way the cells are defined.
Cells to be changed: These are all the cells in the eigenvector matrix P. Recall that in the construction of the excel sheet we had populated this matrix with dummy values. These values now will be changed through the Solver function to ensure that all the constraints are met.
Constraints: We will ‘Add’ the following constraints in the Solver function:
- λ1 ≥…≥λk ≥0
- All cells in the diagonal matrix, with the exception of the diagonal, should equal zero
Once the target cell, cells to be changed and constraints have been defined we will run the Solver function to determine the final values for the eigenvectors and eigenvalues.
Determine the degree of explanation needed and select the number of principal components to be used
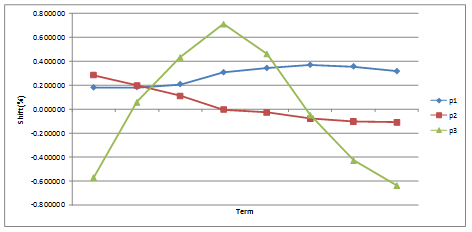
We need to define a degree of explanation that represents a significant level of explanation of the variance of the term structure. In our example we have defined this as 95%. The number of PCs that satisfy this condition cumulatively are the number of volatility functions we will use in our interest rate model. In our case the first three PCs in our example explain 96.09% of the total volatility and therefore these three PCs are selected as they provide a significant explanation of the variance in our term structure.
A plot of these 3 PCs is given below:
There are two final steps that are needed before the results of this analysis can be utilized for interest rate modelling. These include:
- Determining the functional forms of the principal components selected.
- And, the calibration of the weights/ scaling factors assigned to these volatility functions so that the combined volatility derived from these functions matches the volatilities inherent in the return series on the calculation date.
The latter step is required for two reasons. Firstly because the volatility is being defined using a limited number of PCs (i.e. some element of variance remains unexplained) and secondly because these PCs are being assigned functional forms that may not always match the PCs inherent in the rates. We calibrate the weight of the selected factors by minimizing the squared differences between
- certain values of the covariance matrix, Σii (i.e. the covariance of consecutive differences for a specific tenor with itself) and
- the squared weighted average sum of the principal component variances selected (as determined by using their functional forms), across all tenors as given by the following:
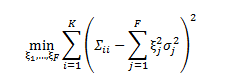
Where ξj’s are the weights of the selected F number of PC that will be solved for by minimizing the above equation across the K tenors used in the study. σj is the value of the volatility function j, for a given tenor i.
In this post we defined the Solver Function in Excel so that a solution could be obtained for the eigenvectors and eigenvalues. The eigenvalues were used to assess what the principal components of the term structure were. Functional forms were determined for the selected eigenvectors and weights for each functional form were determined by calibrating the derived volatility with that actually observed.
If you would like to buy this complete course as a PDF file or the sample EXCEL sheets, please see the Interest Rate Modelling section at our online finance course store. The online finance course store includes easy-to-read-and-work-with downloadable pdf files, excel templates and ready-to-work-with models that are shared to illustrate usage and speed up learning and pick-up for advanced financial modeling, forecasting and simulation topics including interest rate forecasting and simulation, value at risk analysis, collateral valuation, asset liability management and other related middle office and risk topics.
Read more: Addendum: How to conduct a Principal Component Analysis in EXCEL
Comments are closed.